GOM, a company of the ZEISS Group, specializes in industrial 3D coordinate measuring technology, 3D computed tomography and 3D testing. GOM internationally sets standards in optical 3D metrology. The company helps customers worldwide to increase product quality, optimize processes and thus produce more efficiently.
From product development to production and distribution, GOM offers machines and systems for manual and automated 3D digitizing, evaluation software, training and professional support from a single source. Today, more than 17,000 system installations accelerate and improve product development and manufacturing processes for international companies in industries such as automotive, aerospace, energy and consumer goods, for their suppliers as well as for many research institutes and universities.
With more than 60 sites and a network of around 1,000 metrology specialists, GOM guarantees professional advice and first-class service to operators on site in their local languages. Regular training courses and an eLearning platform offer standardized and process-related metrological education for all systems. International industry and technology events promote knowledge transfer and networks.
GOM has been developing 3D measuring technology in Braunschweig, Germany, since 1990. Today, GOM employs more than 500 people in Braunschweig. In the research and development departments, around 100 engineers, mathematicians and scientists ensure that today’s optical measuring technology will also be leading in the future.
Since mid-2019, GOM has been a part of the ZEISS Group and has formed the Center of Excellence for optical metrology. With more than 31,000 employees in 50 countries, ZEISS is an internationally leading technology enterprise operating in the fields of optics and optoelectronics. In the previous fiscal year, the ZEISS Group generated annual revenue totaling more than 6.4 billion euros in its four segments Semiconductor Manufacturing Technology, Industrial Quality & Research, Medical Technology and Consumer Markets (status: September 30, 2019).
ATOS Q: The New Compact Outperformer
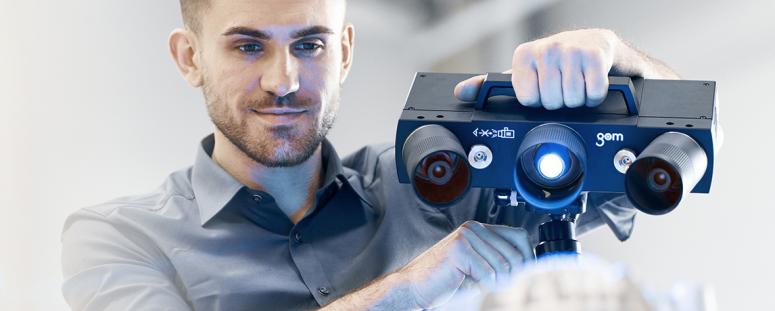
GOM’s new ATOS Q is a powerful 3D scanner for complex inspection tasks. The light and flexible system is equipped with interchangeable lenses suitable for small to medium-sized parts and comes with the latest GOM software.
When it comes to product quality assurance and process optimization, many companies rely on GOM’s optical 3D measuring systems. The application fields of 3D metrology range from the automotive, forming, plastics and casting industries to the aerospace industry. Combining high-tech electronics and optics with robust design and powerful software, ATOS systems are at the forefront when it comes to high-precision measuring results.
Proven reliability and speed
For its latest development, ATOS Q, GOM is again relying on the proven functions of the ATOS measuring systems. The ATOS design comes with protected optics and electronics, making the sensor resistant for measuring tasks in harsh industrial environments. The new product incorporates proven ATOS technology features such as the Triple Scan Principle, the Blue Light Equalizer and precise calibration as a self-monitoring system with active temperature management. Its high performance makes the compact new scanner a top performer: the fringe projection required for precise measurements is performed at high speed and the integrated fiber optic cables enable rapid data transmission and high data throughput. Like all the other ATOS 3D scanners, the compact system meets high metrological requirements and is provided with the latest inspection software GOM Inspect Suite.
Compact and flexible in use
With its compact dimensions of 340 mm x 240 mm x 83 mm and a weight of less than 4 kg, the ATOS Q scanner is mobile and flexible in use. The operator can use the 3D scanner exactly where the measuring task is to be performed – in the measuring room or directly in the production hall. The ATOS Q scanner can be operated manually on a tripod, semi-automated or even fully automated in combination with ATOS ScanBox 4105, where it achieves its maximum efficiency. The advantages of this automated solution are obvious: Series measurements can be carried out easily and quickly, the measuring results are reproducible and influences through user intervention are reduced.
Versatile use thanks to interchangeable lenses and different resolutions
ATOS Q covers a wide range of components in various industries. From small injection-molded parts, molds and tools to complex additive manufactured components, it digitizes the entire surface of small to medium-sized measuring objects in 3D. With five different, interchangeable lenses, the system achieves measuring areas from 100 x 70 mm2 to 500 x 370 mm2. Changing from the smallest to the largest measuring volume is easy thanks to the fixed camera position.
To meet the different measurement requirements, ATOS Q is available in two versions with different camera resolutions: 12 M and 8 M, which means the first sensor captures up to 2 × 12 million and the second 2 x 8 million coordinate points during scanning. The accuracy, resolution and the measuring area can be freely defined.
The ATOS technology in detail
The Triple Scan Principle integrated in the ATOS measuring systems facilitates the measurement of reflective surfaces and objects with undercuts. The Blue Light Technology projects precise fringe patterns onto the surface of the object, which are then recorded in a stereo camera setup by two cameras. The projection technology works with narrow-band blue light, which means that interfering ambient light can be filtered out during image acquisition. The Blue Light Equalizer increases the brightness of the light source and generates uniform, speckle-free light. This allows short measuring times to be achieved even on non-cooperative surfaces.
Metal-Interface takes great care to protect your privacy: when you submit a request or ask a question, your personal information is passed on to the supplier concerned or, if necessary, to one of its regional managers or distributors, who will be able to provide you with a direct response. Consult our Privacy Policy to find out more about how and why we process your data, and your rights in relation to this information. By continuing to browse our site, you accept our terms and conditions of use.
 Optimise your processes Press release
GOM GmbH
Published on 15/07/20
